 This delectable little cake hails from a cute little cookbook that my daughter, Megan, received from our friends the O'Brien's when we shared the first night of Hanukkah together. Megan has enjoyed baking several recipes from it and I used it as my resource for our "Last Day of School" celebration lunch. :-) My kiddos absolutely devour Rocky Road ice cream any time I buy it, so I knew they would be thrilled to see these waiting for them after school. The cake is marbled with white and chocolate batter and is incredibly moist and delicious. The topping is a mixture of toasted coconut, peanuts, dried cherries and marshmallows. All those yummy little goodies are then tossed in melted milk chocolate and mounded onto the tops of cupcakes. Oh yummy!! These were a huge hit with my kids to begin our summer vacation.
From the heart of my kitchen to yours may your experience be fun and the food always flavorful. Enjoy!Rocky Road Cupcakes
1 stick butter, softened
1/2 teaspoon vanilla extract
2/3 cup sugar
2 eggs
1 1/4 cups self-rising flour, sifted
1/3 cup milk
pink food coloring
1 1/2 tablespoons cocoa powder
2 teaspoons milk, extra
Rocky Road Topping
1/2 cup unsalted roasted peanuts
1 cup red candied cherries, halved
1 cup pink and white marshmallows, chopped coarsely
1/2 cup flaked coconut, toasted
7 ounces milk chocolate, melted
Decorations
2 ounces milk chocolate chips, melted
1. Preheat oven to 350 degrees. Line 6-hole oversize (Texas) or 12-hole standard muffin pan with paper baking cups.
2. Beat butter, vanilla, sugar and eggs in small bowl with electric mixer until light and fluffy. Stir in sifted flour and milk in two batches.
3. Divide mixture evenly among three bowls. Tint one mixture pink. Blend sifted cocoa with extra milk in cup; stir into another mixture. Leave third mixture plain.
4. Drop alternate spoonfuls of the mixtures into baking cups. Pull a skewer backwards and forwards through mixtures for a marbled effect; smooth surface.
5. Bake large cakes about 30 minutes, small cakes about 20 minutes. Turn cakes onto a wire rack to cool.
6. Combine ingredients for rocky road topping in medium bowl.
7. Place topping on tops of cakes; drizzle with chocolate.
Source: cupcakes
 Many of the food blogs that I visit regularly have boasted about the book "Artisan Bread in Five Minutes a Day". The concept of having the ability to bake homemade breads on a daily basis without the many hours of preparation truly intrigued me. I wondered how a refrigerated dough could yield so many wonderful breads without a time-consuming, all day affair. So, like any faithful foodie, I ran to our neighborhood Barnes and Noble and purchased the book. :-)
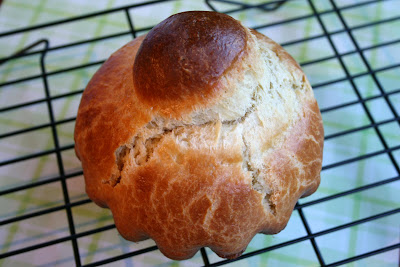
Last week my friend Sarah and I enjoyed another afternoon of baking. One of the items we chose to work with was the Brioche dough from my new book. We divided the dough between us and this is my first completed bread from my "starter". I know Sarah had had great success with the two recipes that she baked up with her dough, so you'll have to be on the look-out for her creations on her food blog too. I loved how quickly I had a loaf of fresh, homemade bread cooling on my kitchen counter. As I've said before, there's something about baking bread that gives me a feeling of comfort and satisfaction. If you haven't purchased this amazing book yet, go now...run don't walk to your nearest bookstore and get it. It truly changes how bread baking can be accomplished in our busy homes.
From the heart of my kitchen to yours may your experience be fun and the food always flavorful. Enjoy!
 I absolutely love my slow cookers and the freedom they offer me on busy days. :) I am always on a continual search for new, exciting recipes that may appeal to my entire family. This dish was so, so simple to prepare and took only 15 minutes to "throw" into my slow cooker. But, please don't let the simplicity lead you to think that this dish lacked big flavor! Oh My! The sauce consisting of only dry onion soup and cream of mushroom soup was fantastic and gave the chicken and veggies a rich flavor. Served with a side of rice, this dish was given HUGE thumbs up from every one of my food critics! Yeah. :-)From the heart of my kitchen to yours may your experience be fun and the food always flavorful. Enjoy!Saucy Chicken with Veggies and Rice
3 cups sliced celery
3 cups sliced fresh carrots
2 cups sliced onion
6 boneless skinless chicken breast halves
1 can (10-3/4 oz.) condensed cream of mushroom soup, undiluted
1 envelope onion soup mix
1 tsp. dried thyme
1 tsp. pepper
1/2 tsp. dried tarragon
2 Tbsp. cornstarch
1/3 cup white wine or chicken broth
Hot cooked rice
Place the celery, carrots, onion and chicken in a 5-quart slow cooker. In a small bowl, combine the soup, soup mix, thyme, pepper and tarragon, pour over chicken. Cover and cook on low for 4-5 hours or until a meat thermometer inserted into the chicken reads 170 degrees.
Mix cornstarch and wine until smooth; stir into slow cooker. Cover and cook on high for 30 minutes or until gravy is thickened. Serve with rice. Yield: 6 servings.
Source: Taste of Home; Simple & Delicious Jan/Feb 2009
 Lately, versatile and portable foods have been the key to family nutritious dinners around our home. I can't say that we haven't had the occasional fast food drive-through on our way to soccer, baseball or cheerleading, but, thankfully, it's been minimal thanks to some fantastic recipes that I've found.
These calzones were extremely delicious and wrapped up nicely in foil to travel in the car. As you can tell from my picture, they were gooey with yummy cheese, had nice big chunks of chicken and the added nutrition of fresh spinach. I can't share with you how pleased I felt to quickly prepare a nutritious dinner for my family and send them off to their various activities with a full stomach. :) This was so much healthier than anything the kids would get at a drive-through and much better for our budget too.
From the heart of my kitchen to yours may your experience be fun and the food always flavorful. Enjoy!
Chicken Spinach Calzones
3 chicken breasts, chopped
1 (10-ounce) bag fresh spinach
1 (16-ounce) jar prepared Alfredo sauce
1 (8-ounce) package sliced provolone cheese, diced
1 (8-ounce) package fresh basil
About 1 cup cooked mushrooms (I omitted)
2 tablespoons minced garlic
1 teaspoon kosher salt
1 teaspoon ground black pepper
3 (13.8-ounce) cans refrigerated pizza dough
Prepared marinara sauce and pesto sauce (optional)
Garnish: fresh basil
Preheat oven to 425 degrees. Line a baking sheet with parchment paper; set aside.
In a large bowl, combine chicken, spinach, Alfredo sauce, cheese, basil, mushrooms, garlic, salt and pepper.
Unfold one can of dough onto prepared baking sheet. gently stretch or roll into an 11-inch square; cut in half diagonally, forming two triangles. Place about 1 1/2 cups chicken mixture in the center of the triangle, leaving a 1-inch border on each side. Fold 1 side of triangle over filling, rolling up edges of dough to seal. Cut a small slit in top of calzone to allow steam to escape. Repeat with remaining dough and chicken mixture. Bake for 15 minutes or until golden brown. Serve with marinara sauce and pesto sauce, if desired. (The marinara was fantastic with these!!) Garnish with fresh basil, if desired.
Source: Cooking with Paula Deen-January/February 2009
 The last couple of weeks have been jam packed with our many extra-curricular activities with the kids. While I have continued to prepare dinners for our family, it has typically been quick, easy, tried and true recipes that I whip up during this incredibly busy schedule; so, I haven't had any yummy, new and exciting recipes to post for awhile now. Thankfully I remembered that I still had this delicious dinner in my blog archives ready to go. :)
Several weeks ago, my friend Sarah and I had spent the day baking (again) and then enjoyed preparing this dish together for our dinner. The dish was very simple to put together and was a welcome and delicious change to my normal lasagna. The kids have since asked numerous times when I am planning to fix this again...yay, another new success out of my kitchen.
From the heart of my kitchen to yours may your experience be fun and the food always flavorful. Enjoy!
Mexican Lasagna
2 pounds ground beef
1 onion, chopped
2 teaspoons minced garlic
1 (2 ounce) can black olives, sliced
1 (4 ounce) can diced tomatoes with green chili peppers (We used Rotel Brand)
1 (16 ounce) jar taco sauce
2 (16 ounce) cans refried beans (We reduced this to 1 can)
12 (8 inch) flour or corn tortillas
9 ounces shredded Colby or Cheddar Cheese
Preheat oven to 350 degrees.
In a large skillet over medium heat, saute the ground beef for 5 minutes. Add the onion and garlic, and saute for 5 more minutes. Drain any excess fat, if desired. Mix in the olives, green chile peppers, tomatoes with green chile peppers, taco sauce and refried beans. Stir mixture thoroughly, reduce heat to low, and let simmer for 15 to 20 minutes.
Spread a thin layer of the meat mixture in the bottom of a 4 quart casserole dish. Cover with a layer of tortillas followed by more meat mixture, then a layer of cheese. Repeat tortilla, meat, cheese pattern until all the tortillas are used, topping off with a layer of meat mixture and cheese.
Bake for 20 to 30 minutes in the preheated oven, or until cheese is slightly brown and bubbly.
Source: For the life of me I can't remember where I found this recipe, but would love to give credit to whomever it originated, so if this is your recipe, please let me know.
 This delectable little cake hails from a cute little cookbook that my daughter, Megan, received from our friends the O'Brien's when we shared the first night of Hanukkah together. Megan has enjoyed baking several recipes from it and I used it as my resource for our "Last Day of School" celebration lunch. :-) My kiddos absolutely devour Rocky Road ice cream any time I buy it, so I knew they would be thrilled to see these waiting for them after school.


