 That's right, you read it correctly; Triple Chocolate Bread. This is the last of the bread/muffin recipes that I've prepared for my family this week. For some chocolate is something that is enjoyed as a snack, for others (insert our family here) it can be enjoyed in the morning as part of breakfast. Not so healthy, not recommended by many, but greatly enjoyed just the same. :)
The kids flipped over this bread and I have to admit it took all my will power to not sit and devour both loaves. If you're having a serious chocolate craving this will satisfy your soul! Every moist bite of bread is full of mini chocolate chips and it's all topped with a delectable glaze made from more chocolate chips and cream. Mmm-divine!!From the heart of my kitchen to yours, may your experience be fun and the food always flavorful. Enjoy! Triple- Chocolate Quick Bread1-1/2 cups miniature semisweet chocolate chips, divided
1/2 cup butter, softened
2/3 cup packed brown sugar
2 eggs
1-1/2 cups applesauce
2 teaspoons vanilla extract
2-1/2 cups all-purpose flour
1 teaspoon baking powder
1 teaspoon baking soda
1 teaspoon salt
Glaze1/2 cup miniature semisweet chocolate chips
1 tablespoon butter
2 to 3 tablespoons half-and-half cream
1/2 cup confectioner's sugar
1/4 teaspoon vanilla extract
Pinch salt1. In a microwave-safe bowl, melt 1 cup chocolate chips; set aside. In a large mixing bowl, cream butter and brown sugar until light and fluffy. Add eggs and melted chocolate; mix well. Add the applesauce and vanilla. Combine the flour, baking powder, baking soda and salt; add to creamed mixture and mix well. Stir in the remaining chocolate chips.
2. Spoon in four greased 5-3/4-in. x 3-in. x 2-in. loaf pans. (I used two 9-in. x 5-in. pans and baked for approximately 60 minutes) Bake at 350 degrees for 35-40 minutes or until a toothpick inserted near the center comes out clean. Cool for 10 minutes before removing from pans to wire racks.
3. For glaze, melt chocolate chips and butter in a small heavy saucepan; stir in cream. Remove from the heat. Stir in the cream. Remove from the heat. Stir in the confectioner's sugar, vanilla and salt. Drizzle over warm bread. Cool completely.
Source: The Taste of Home Baking Book
 Here is another breakfast option that I have baked for my family this week. I have always loved the moist texture and yummy citrus taste of lemon poppy seed bread and when I found this recipe with oatmeal added and in the form of muffins, I was hooked. Three out of my four kiddos begin taking ISTEP tests again next week and I worry that their minds will begin to day dream if their tummies aren't satisfied with a healthy breakfast. Studies have shown that oatmeal is a perfect breakfast for students' brain power because it's a slow burning carbohydrate that is full of rich nutrients. With the oatmeal added these muffins are a perfect way to sustain not only their hunger but their brain power too! A definite win for all!Personally, I loved the texture and taste of these little muffins, but I believe I baked them a little too long because they were a little on the dry side. Therefore, these weren't a huge hit with the kids. When I bake them this weekend for the upcoming testing week, I plan to increase the lemon juice for even more citrus taste, decrease the amount of poppy seeds (because of my picky eaters), and be REALLY careful on the baking time. :) The original recipe called for an optional streusel topping but since the kids LOVE anything iced, I whipped up a glaze consisting of confectioner's sugar and lemon juice. Wow, it was perfect for the muffins!From the heart of my kitchen to yours, may your experience be fun and the food always flavorful. Enjoy!
 Lemon Oatmeal Poppy Seed Muffins
1 1/2 cups all-purpose flour
1 cup oats
2/3 cup sugar
4 teaspoons poppy seeds
2 teaspoons baking powder
1/2 teaspoon baking soda
3/4 cup milk
1/4 cup oil
1 egg or 2 egg whites
1 tablespoon lemon juice
2 teaspoons grated lemon rind (I omitted)
Optional Streusel1 tablespoon sugar
1 tablespoon butter
1/4 cup oats1. Heat oven to 400 degrees.
2. Line 12 muffin cups with baking cups or lightly grease bottoms only.
3. Mix streusel and set aside.
4. Combine dry ingredients and mix well. Add liquids and mix just until dry ingredients are moist.
5. Fill muffin cups 2/3 full.
6. Sprinkle streusel over muffins and pat gently.
7. Bake 18-20 minutes. (Watch carefully-don't overbake!!)
Source: Recipe Zaar
 Lately my little ones have been begging for me to find new, yummy recipes for their breakfasts during the school week. We've been in a "cold cereal" funk for a couple of weeks and they're ready for Mom to get back into the groove and bake some goodies for them to enjoy early in the morning.
 I just purchased the "Taste of Home Baking Book" which has so many fantastic recipes with amazing, colorful pictures. I've been dieing to bake something from it but just haven't had the opportunity until late this past week.
  When I saw the picture of this coffee cake, I knew that this recipe would be one of the first recipes I would to try. Personally, coffee cakes are a favorite of mine. There's nothing better to start your morning with than a hot cup of coffee and sweet, cinnamony cake
.
The ingredients are ones that I typically have stocked in my pantry and refrigerator and I knew from baking cakes with sour cream in them before that this would be a super moist, delicious cake. It took no time at all to whip this cake up and have it ready to go into the oven for baking and ohhh it smelled wonderful while baking. The aroma in my kitchen was so mouth wateringly good that it nearly had me pulling this cake out too early just to cut a slice. It came out of the oven beautifully and the next morning when I finally had the opportunity to enjoy a large slice with my coffee, I savored every delicious, moist bite. Oh...yes, the kids loved it too. :o)From the heart of my kitchen to yours, may your experience be fun and the food always flavorful. Enjoy!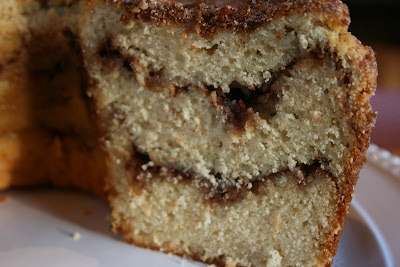 Cinnamon Coffee Cake1 cup butter, softened
2 - 3/4 cups sugar, divided
4 eggs
2 teaspoons vanilla extract
3 cups all-purpose flour
1 teaspoon baking soda
1 teaspoon salt
2 cups (16 ounces) sour cream
2 tablespoons ground cinnamon
1/2 cup chopped walnuts1. In a large mixing bowl, cream butter and 2 cups sugar until light and fluffy. Add eggs, one at a time, beating well after each addition. Beat in vanilla. Combine the flour, baking soda and salt; add to the creamed mixture alternately with sour cream, beating just enough after each addition to keep butter smooth.
2. Spoon a third of the batter into a greased 10-inch tube pan. Combine the cinnamon, nuts and remaining sugar; sprinkle a third over batter. Repeat layers twice. Bake at 350 degrees for 60-65 minutes or until a toothpick inserted near the center comes out clean. Cool for 15 minutes before removing from pan to a wire rack to cool completely.
Source: The Taste of Home Baking Book
 Do you wonder if you'll ever get your children to eat any fish besides the gross, frozen fish sticks? Are you looking for a quick, economical meal to prepare for you family? If so, I have the perfect recipe for you!
Salmon cakes have been a favorite of mine since childhood. I remember my brother and I smothering these little patties with ketchup, but we ate what was on our plate so Mom and Dad never said a word. As I've prepared these over the years for my family, I've tried adding and omitting many ingredients to perfect this to please our entire family. I have finally come up with an ingredient list that satisfies all my little picky palates and still has the texture and delicious taste that I'm looking for as an adult. These are great served alongside a fresh, crispy salad and steamed vegetables. They're even wonderful heated up the next day for lunch!From the heart of my kitchen to yours, may your experience be fun and the food always flavorful. Enjoy!
 Savory Salmon Cakes
1 - 14.75 oz. can Alaskan Salmon
1/2 cup Italian Bread Crumbs
2 eggs
2 - 3 teaspoons Old Bay Seasoning
1/4 cup chopped green onion
2 - 3 Tablespoons Dijon Mustard
Salt & Pepper to tasteAdditional Bread Crumbs to roll patties in
Choice of oil to brown pattiesWarm 2 - 4 Tablespoons oil in frying pan on medium-low. Mix all ingredients together. Form mixture into patties (I use 1/4 cup measuring cup to form equal sized patties). Roll patties in bread crumbs and brown equally on both sides (4 - 5 minutes per side).Source: Mom
 I am always looking for new, exciting foods to serve my family for breakfast. Marty leaves for work very early in the morning and the bus schedule for the kids attending three different schools gets pretty crazy too. It's always handy to have something that's easy for the kids to grab on their own and that Marty can munch on in the car.
Typically my go to idea is muffins. Our entire family loves muffins of any and every kind, but I've been on the quest to find something new and delicious. When I found this recipe I was so excited, it didn't have any pictures with it but just reading through the ingredients and directions on how to prepare these, I knew they would be a huge hit with everyone.As I said in my last post, my friend Sarah and I have spent alot of time together in the kitchen preparing for Valentine's day. One evening as we were waiting for the cookies to cool, she and I decided to bake these doughnuts for our families. We baked several batches and had plenty to send a platter with Marty to work. From what I was told, a few of the guys enjoyed more than a couple of yummy doughnuts. The platter came home empty and the guys apparently went home full. Try this fantastic recipe for baked doughnuts and see if these are a huge hit with your family too. They're definitely going to make a regular appearance in our home.From the heart of my kitchen to yours, may your experience be fun and the food always flavorful. Enjoy!Baked Apple Doughnuts1-1/2 cup flour
1-3/4 teaspoons baking powder
1/2 teaspoon salt
1/2 teaspoon nutmeg
1/3 cup of sugar
1/3 cup shortening
1 egg, beaten
1/4 cup milk
1/2 cup peeled and grated apple
1 teaspoon cinnamon
1/2 cup melted butterStir first 4 ingredients and 1/2 cup sugar together into bowl. Cut in shortening until crumbly. Stir in egg, milk and apple, mixing well. Fill greased muffin cups 2/3 full. Bake at 350 degrees for 20 minutes. Mix 1/3 cup sugar and cinnamon in small bowl.Remove doughnuts from pan and roll in butter (we brushed butter on with pastry brush), then roll in sugar mixture.Source: A View of America-Recipes
 Happy Valentine's Day!! I love (no pun intended) this holiday. I probably like it more now that we have kids-the adorable parties at school, the cute t-shirts to purchase for my girls to wear in pinks and reds, seeing hearts and bright colors everywhere in the midst of dreary Indiana weather and of course it offers another reason to bake cookies and cupcakes to share with classmates, teachers, friends and family.This year Valentine's Day was even more special. Why? My dear friend, Sarah, and I debuted our new venture with these adorable cookie bouquets. Decadent Dreams Bakery & Catering is officially in business!! We are offering specially made cakes, cupcakes, cookies, bouquets, pastries and much, much more for all occassions. If you can dream it, we can bake it. Exciting news huh?
This was the perfect time to launch our new venture. Who doesn't love heart shaped cookies iced with pinks and reds? Sarah and I had so much fun baking and decorating cookies and putting them together in festive, hand painted pots. We sold several bouquets and received rave reviews from all that purchased one. WHEW!! Aren't these the cutest darn cookies? I think these are possibly my absolute favorite! Any time my Granny has ever sent me a card or written me a note, however small it is, she ALWAYS puts x's and o's at the bottom. This past summer I pulled into our driveway and noticed something sitting beside one of my flower pots and a note tucked under the pot. Sure enough, Granny had stopped by and brought the kids some goodies and left a note telling us she had missed us and at the bottom of the torn piece of paper was her infamous x's and o's.
  These double hearts were alot of fun to plan and ice. I was thinking inside my very conservative box when Sarah suggested we fill each heart with different colors and pipe with the opposite color. I love how they turned out.
 A simple pink heart piped with bright red and white lines to form a plaid pattern
.
 Sometimes simple says it all. We loved this heart cut-out cookie in red with piped white polka-dots. Yes, of course we ate the small heart that was cut out of the middle. :o) It helped give us the additional fuel for the long, late night hours we put in to complete our first orders.
From the heart of my kitchen to yours, may your experience be fun and the food always flavorful. Enjoy!
 A couple of weeks ago I hosted an all day baking excursion with two of my friends. It was a day filled with laughter, fun and togetherness baking some fantastic treats. The girls were so gracious to bring soup, salad and homemade bread for lunch since I had provided the kitchen to play in. My friend Sarah brought this amazing soup that she had bookmarked from Brown Eyed Baker. Sarah was kind enough to leave plenty of soup for my family's dinner that evening so I could wrap up and clean the kitchen. Marty and the kids LOVED dinner and Marty even requested some to be packed up for his lunch the next day. Pretty impressive! This soup has many wonderful textures from the crispiness of the carrots, the spiciness of the sausage, the depth of two kinds of beans and the fun of tiny pasta noodles in all. Mmmm!I had put this soup on our menu for last week and thought I had everything in the pantry that I needed. Does this ever happen to you? You are in the midst of preparing dinner and you go to the shelves only to realize that you don't have a major ingredient? Well, that's what happened when I went to add the tomato sauce to the soup. I had many kinds of tomatoes, but no sauce. What I did have was a jar of traditional spaghetti sauce. I was too far into making the soup to turn back so I grabbed the spaghetti sauce and poured it in hoping for the best. Oh my...we loved the extra kick the spaghetti sauce added! I believe it's a permanent change to this already fantastic soup. When you're ready for a hearty, Italian soup for dinner, give this recipe a try and you'll see why this is one of our new favorites!
From the heart of my kitchen to yours, may your experience be fun and the food always flavorful. Enjoy! Pasta Fagioli
2 tablespoons butter, divided
1 package sweet Italian sausage, casings removed
1/2 large (or 1 medium) onion, finely chopped
4 cloves garlic, minced
4 carrots, thinly sliced
4 stalks celery, thinly sliced
28 ounce can diced tomatoes
1 can red kidney beans, drained and rinsed
1 can white cannelini beans, drained and rinsed
64 oz. beef broth
28 ounce can tomato sauce
2 teaspoons dried parsley
1/2 teaspoon dried basil
1 teaspoon salt
4 oz. small dry pasta (Ditalini)1. Melt 1 tablespoon of the butter in a large stockpot over medium high heat, and brown the sausage, crumbling it as it cooks. Once brown, remove sausage from pot with a slotted spoon and discard any grease that remains in the pot.
2. Melt remaining 1 tablespoon of butter in the same pot, and add the onion, garlic, carrot and celery and saute over medium heat until vegetables are soft, about 8 minutes. (I cooked a little less so that the carrots still had a little crispiness)
3. Add sausage back to the pot, add the can of diced tomatoes (do not drain), stir briefly, and simmer for 10 minutes.
4. Stir in the beans, and add the beef broth and tomato sauce. Add in all the seasonings, stir well, turn the heat to high and bring the soup to a boil. Once it boils, turn down to low heat, cover, and simmer for at least 30 minutes.
5. Add the dry pasta and continue to simmer on low for another 30 minutes.
Serve with your favorite bread or crackers.Source: adapted from Delectable Dining, originally from Brown Eyed Baker
 One of the most popular appetizer for sports watching on tv with friends has to be hot wings. I have never cared for wings that are too spicy to savor and enjoy but love the tender meat of tiny drumsticks and wings.Years ago, when Marty and I were visiting his brother and sister-in-law in Georgia, Pam fixed these tender and not too spicy wings. I fell in love with the flavor of the meat and the sauce had just the right kick that it didn't send me running for a gallon of water to douse a fire in my mouth. Pam shared her recipe with me and I have fixed them countless times and always receive positive comments on them.
 The great flavor of the meat comes from marinating the wings/pieces in teriyaki sauce overnight. I buy wing pieces in a large bag and simply pour the teriyaki straight into it and place the bag into a plastic bowl to assure no "drips" contaminate the fridge. The pieces are baked for an hour in the sauce and then placed in a slow cooker with the hot sauce. Simple, quick and delicious. LOVE IT! Next time you're hosting a gathering and are looking for something meatier to feed your guests try this fantastic recipe and watch these babies disappear!
From the heart of my kitchen to yours, may your experience be fun and the food always flavorful. Enjoy!Teriyaki Chicken Wings
4 - 5 lb. bag of frozen chicken wings/pieces
12 oz. bottle of teriyaki sauce
1/2 cup butter, melted
12 0z. bottle Frank's Original Hot Sauce
1. Marinate wings in teriyaki sauce overnight-turning every few hours.
2. Bake wings in sauce @ 425 degrees for 1 hour, turning half way through.
3. Pour sauce off wings and place in slow cooker on low.
4. Mix melted butter and bottle of hot sauce together and pour over wings.
5. Stir to combine thoroughly with wings. Let warm for 1 hour prior to serving.
Source: Pam Ooley
 When I plan Chicken Enchiladas on our weekly menu, I make sure that I have the ingredients for two of our favorite recipes. Why two? One recipe requires a little more time and effort to prepare and the other is quick, simple and equally as delicious. As I've said before, I care for the children of two of our school's teachers. Anyone who has raised or cared for small children knows that there are times, that by the end of the day, any meal that requires alot of time, effort and energy isn't going to make it to the table. Right? That's why I make sure to plan a few "backup" meals during the week. No matter what kind of day I may have, I'm assured that my family will have a tasty meal in the evening.Most of the ingredients called for in this recipe you probably already have stocked in your pantry. These enchiladas are incredibly cheesy and just a little bit spicy, thanks to the chili pepper. Because my kids LOVE cheese, I double the cheese mixture for the enchiladas. Mmmm! With this recipe, no matter how busy and hectic your day has been, you can have a wonderful, delicious dinner on the table and maybe still have a few minutes to relax. Wouldn't that be wonderful?! :-)
 Cheesy Chicken Enchiladas
1 can Campbell's Condensed Cheddar Cheese Soup (I use 2)
1/2 cup milk (1 cup)
2 cups chopped cooked chicken
3/4 cup Pace Picante Sauce
1 tsp. chili powder
8 flour tortillas
Mix soup and milk.Mix 2 tbsp. soup mixture, chicken, picante sauce and chili powder.
Spread 1/2 cup soup mixutre in 3 quart shallow baking dish. Spoon about 1/4 cup chicken mixture on each tortilla. Roll tortilla around filling and place seam-side down in baking dish. Top with remaining soup mixture. Cover.
Bake at 350 degrees for 25 minutes or until hot.
Source: Campbell's Kitchen
 That's right, you read it correctly; Triple Chocolate Bread. This is the last of the bread/muffin recipes that I've prepared for my family this week. For some chocolate is something that is enjoyed as a snack, for others (insert our family here) it can be enjoyed in the morning as part of breakfast. Not so healthy, not recommended by many, but greatly enjoyed just the same. :)
 Triple- Chocolate Quick Bread


