Friday, November 28, 2008

Caramel Corn

I pray that you all had a wonderful and restful Thanksgiving Day and that you took a moment to look around to see all your blessings for which to be thankful for. I always love to be surrounded by my family and enjoy the sound of the kids' laughter and raucous playing in the background while my Mom and I finish preparations for dinner. We all have so much to be thankful for!


My Granny has been unable to join us for Thanksgiving dinner for a couple of years, but we were thrilled to be able to set a place for her at the table yesterday. I have shared with you before that my Granny has been a large influence to my love of cooking and baking. I remember as a child watching Granny and Mom spend hours in a hot kitchen working hard to get a fantastic holiday meal to the table. Oh..those were great days, listening to Mom, Granny and my Grandma talk, laugh and cook together. Three incredibly amazing women!!

There were several times yesterday I became nostalgic and thought back to the many special treats Granny would fix for her five grandchildren to celebrate the many wonderful holidays falling between Halloween all the way through to Superbowl Sunday. I often wish my memory had a recorder that captured every moment that I took for granted as a child. Do you ever wish we could imprint the importance of savoring every moment to our children? We all seem to realize all the "should haves" a little too late. :)

There are many treats that Granny fixed us that I have begun to share with my own kids. One of these special treats that I'm sharing with you today Granny would prepare before Halloween and have on hand every time we were at the farm. She never allowed me to help in the preparation of the Caramel Corn because she was always cautious about the boiling caramel and never wanted any of us to get hurt, but I often stood at the kitchen door and watched with great curiosity as to how she fixed this yummy treat. I asked her several years ago to write the recipe down (so I would have it in her handwriting) and I began to make it for my kids. It's become one of our favorites and it'll be on hand all weekend as we decorate the house for Christmas.

This caramel corn is pretty easy to prepare and makes about 5 quarts of ooey-gooey, caramely popcorn. If you like your popcorn with just a little caramel on each kernel instead of "stick-to-your-teeth" caramel corn, pop an additional couple of quarts of corn for the recipe. Either way, it's delicious and fantastic to munch on during movies, family game night or just sitting by a crackling fire watching the twinkling lights on your Christmas tree. Enjoy!

Caramel Corn

5 quarts popped popcorn-unbuttered
1 cup (2 sticks) unsalted butter
2 cups firmly packed brown sugar
1/2 cup dark corn syrup
1 Tbsp. molasses
1 teaspoon salt
1/2 teaspoon baking soda
1. Heat oven to 225 degrees. Place popcorn in a large roasting pan; set aside.
2. Combine brown sugar, butter, corn syrup, molasses and salt in a 2 quart saucepan. Cook over medium heat, stirring occasionally, until mixture comes to a full boil. Continue cooking, stirring occasionally, until candy thermometer reaches 250 degrees or small amount of mixture dropped in ice water forms a hard ball. Remove from heat; stir in baking soda. The caramel will foam up a little and turn a lighter color when you add the baking soda.
3. Carefully pour hot mixture over the popcorn. Using a wooden spoon, stir until all popcorn is coated. Place in oven for 20 minutes. Remove from oven, stir to evenly coat the popcorn. Return to oven. Continue cooking for 20 minutes. Remove from oven. Immediately spread caramel corn onto waxed paper. Let cool completely. Break into bite-sized pieces. Store in tightly covered container.
Source: Edna Harris (Granny)

Wednesday, November 26, 2008

Thanksgiving Wishes

Happy Thanksgiving!

I wish you all a very blessed day full of family, fun, laughter, memories and of course....fabulous food! Enjoy!

Tuesday, November 25, 2008

TWD - Thanksgiving Twofer Pie

This week's TWD selection is Thanksgiving Twofer Pie chosen by Vibi of La Casserole Carree. Although Vibi is not celebrating our traditional American holiday, she chose this for all of us English speaking neighbors to enjoy and savor for our special day. Thank you Vibi, that was extremely thoughtful!

I have to apologize that I don't have any pictures to share with you for today's post, but my camera must be experiencing the same kind of week as it's owner and has decided to stop functioning properly....wish I could do the same. :) I plan to serve this pie on Thanksgiving day as one of our desserts and Mom and Dad always bring a camera to capture the kids, so I plan to take a photo of this pie prior to serving it. Look for an update this weekend.

Now to the actual process of preparation. This was a very simple two layer pie to assemble and was literally ready to pop in the oven in no time. I love recipes that are like this! It also combines two of my favorite pies; pumpkin and pecan. Mmmmm, I can't wait to taste a piece of this!!

Again, thank you Vibi for this selection, I'm sure it's going to be a huge hit on Thursday!!

Source: Baking From My Home to Yours with Dorie Greenspan

Saturday, November 22, 2008

Slow Cooker Lasagna

Most Monday's, although I am home throughout the day, our evening commitments allow us approximately 30 minutes to sit down at the table as a family to eat dinner. In this case, I rely heavily on my slow cooker to have dinner ready for us when we rush in the door. Rarely does the crock pot let me down and this recipe was no exception. What a delightful, yummy success on a cold fall evening. It was quick and simple to assemble and had all the wonderful tastes of a lasagna that takes many hours to prepare. The only changes I might make the next time I fix this would be to add Italian sausage to the ground beef for more depth and add a variety of Italian spices to enhance the flavor of the sauce. I can't wait to put this on our weekly menu again this next month when we need a simple, delicious meal during the hustle and bustle of the Christmas season.

Convenient Slow Cooker Lasagna

1 lb. ground beef
2 29-oz. cans tomato sauce
8-oz. pkg. lasagna noodles, uncooked
4 cups shredded mozzarella cheese
1 1/2 cups cottage cheese

1. Spray the interior of the cooker with nonstick cooking spray.
2. Brown the ground beef in a large nonstick skillet. Drain off drippings.
3. Stir in tomato sauce. Mix well.
4. Spread one-fourth of the meat sauce on the bottom of the slow cooker.
5. Arrange one-third of the uncooked noodles over the sauce. (break them up so they fit better)
6. Combine the cheeses in a bowl. Spoon one-third of the cheeses over the noodles.
7. Repeat these layers twice.
8. Top with remaining sauce.
9. Cover and cook on Low 4 hours.

Source: Fix-It and Forget-It Big Cookbook

Monday, November 17, 2008

Sundays For Sarah - Dutch Oven Dinner

To all of you who have been faithful followers of my posts about my "bed-bound" friend...Good News, this past week Sarah was able to avoid seeing her OB because she has been doing so incredibly well! Baby Hannah began her 32nd week of gestation yesterday and we're praying that she continues to behave herself and stays comfortably inside Mommy's tummy for several more weeks. Thank you to everyone who is praying for the O'Briens, God is so Good!

Now for the yummy, food section of my weekly post. This week Sarah chose a recipe that our friend Annie posted on her blog (www.Annieseats.wordpress.com) several months ago. Sarah has a new dutch oven and this recipe was perfect to initiate it with. We rearranged the meal schedule this weekend and prepared dinner on Saturday evening instead of Sunday because of our girls' cheer competition. I'm so glad we didn't decide to skip this week...this was a fun meal to fix. My oldest daughter and I went over to Sarah's and had dinner simmering in less than 30 minutes...give or take with girlfriend chatter and the amusement of watching Josh. The meal was very simple to prepare and according to Mike.."This might be his favorite dish...put cheese on top of meat and voila...delicious." Another great thing about this recipe is that it's prepared with ingredients you probably keep stocked in your pantry and freezer, it makes for a great "go-to" meal when you're in a pinch. Enjoy!

Dutch Oven Dinner

1 lb. lean ground sirloin
1/2 medium yellow onion, chopped
2/3 cup chopped mushrooms
2 cups frozen corn
1 package (10-12 oz.) egg noodles
1 can (28 oz.)diced tomatoes, with juices
2 cups shredded reduced fat cheddar cheese
salt and pepper, to taste

Brown ground beef in 5-quart Dutch oven or large skillet with a lid. Add onion, mushrooms and corn. Season to taste with salt and pepper. Spread uncooked noodles evenly over top. Sprinkle cheese evenly over noodles. Pour the entire can of tomatoes over all. Simmer, tightly covered, for 1 hour, then let it stand 3-5 minutes before serving.

Source: adapted from Annie's Eats

Land of Nod Cinnamon Rolls

I am always looking for new, fun and creative recipes to fix my family for weekend breakfasts. Our weekday mornings are so chaotic getting ready for school that I'm lucky to prepare boxed muffins for the kids, more often than not, they have a bowl of cereal. So, on the weekends, I love to bake something scrumptious and delicious that will put smiles on all their adorable faces.


These cinnamon rolls are so easy to fix due to the use of frozen rolls. You prepare this before bedtime and leave on the counter overnight for the rolls to rise and the next morning you simply bake for 25 minutes and then savor the taste of fresh, homemade cinnamon rolls! Oh, my....these were wonderful! The six of us devoured the entire pan, not a morsel was left on the platter...not even for a mouse. (Sorry, I'm getting into the Christmas spirit a little early. I even have Christmas music playing while I type this!) Marty said that it was the best cinnamon rolls I've ever made for breakfast. Who cares that it was made with frozen rolls, I love to please my family! The original recipe didn't call for any glaze, but a cinnamon roll isn't a cinnamon roll without icing!! I just mixed up confectioners sugar with some milk and vanilla and poured over the warm rolls. D-E-L-I-S-H!!

Land of Nod Cinnamon Rolls

20 frozen dough rolls
1/2 cup brown sugar
1/2 box butterscotch pudding
2 teaspoons cinnamon
3/4 cup raisins (I omitted)
1/2 cup butter, melted

Grease a 10-inch Bundt pan. Add frozen rolls; sprinkle with brown sugar, pudding powder, cinnamon and raisins. Pour melted butter over all. Cover with clean, damp cloth (cheesecloth works best). Leave on counter overnight. Bake at 325 degrees for 25 minutes. Let cool 5 minutes, then turn out onto a platter. Serves 10.

Source: adapted from The Joy of Hospitality Cookbook

Tuesday, November 11, 2008

Chocolate Chip Cookie Dough Cheesecake Bars

After my love for God, my husband and four kiddos, this desert combines my next three loves and absolute favorites of chocolate, cookie dough and cheesecake. Oh my! The taste of all three combined into one amazing desert sky-rocketed me into heavenly bliss. It took most of my willpower to take this with us to a friends' house to share with them at a get together. But because I don't need my backside or thighs to develop into one big, ball of cookie dough...I behaved myself and shared. Everyone raved about the richness and deliciousness of this desert and gobbled most of it up. I did allow myself a little piece and savored every last bite. Mmmmmm!

Chocolate Chip Cookie Dough Cheesecake Bars

Crust
1 & 1/2 cups graham cracker crumbs
5 Tbs. butter, melted
2/3 c miniature semisweet chocolate chips

Preheat oven to 325 degrees. Butter a 9" square baking pan (I used a 9" springform pan). Line pan with parchment paper, leaving enough to extend over the sides. Lightly coat the parchment paper with non-stick cooking spray.

Combine graham cracker crumbs and butter until crumbs are moistened. Stir in chocolate chips. Press crust mixture into bottom of pan. Bake for 6 minutes. Set pan on wire rack to cool.

Cookie Dough
5 Tbs. butter, at room temperature
1/3 cup packed light brown sugar
3 Tbs. granulated sugar
1/8 tsp. salt
1 tsp. vanilla extract
3/4 cup all-purpose flour (I followed the advise of My Kitchen Cafe and reduced the flour by 1/8th of a cup from the 3/4 and found the dough to be very workable)
1 cup miniature semisweet chocolate chips

Using electric mixer, mix butter, brown sugar, sugar, salt and vanilla extract at medium speed until smooth. Decrease mixer speed to low and add flour. Mix just until incorporated. Stir in chocolate chips. Set aside.

Filling
10 oz. cream cheese, at room temperature
1/4 c. granulated sugar
1 large egg, at room temperature
1 tsp. vanilla extract

Using an electric mixer, beat cream cheese and sugar just until smooth. Add egg and vanilla extract, beating just until blended. Pour batter into baked crust. Drop cookie dough by teaspoonfuls over the top of the filling.

Bake about 30-35 minutes, or until set. Transfer to wire rack.

For chocolate topping, melt 1/3 cup semisweet chocolate chips in a double boiler or in the microwave. (Tip: put the chocolate chips into a zipper bag and heat on 50% power for a few minutes. Cut the corner off the bag and squeeze the bag to make drizzling less messy.) Use a teaspoon to drizzle chocolate over top of bars. cool bars in pan completely, about an hour. (Stick the bars in the freezer for 5 minutes to set quickly if you're in a hurry).

Using the edges of the parchment paper, remove bars from pan. Cut into bars (clean the knife after each cut) and serve.

Source: adapted from My Kitchen Cafe

Monday, November 10, 2008

Sundays For Sarah - Vegetable Soup

First let me explain the picture of the pink pig. Sarah is a first grade teacher and I guess you could say her classroom theme is pigs. Well, since I don't have a picture of her dinner on Sunday, (explained later in this post) I thought this would be a cute way of beginning today's update. :-)

This week's post for Sarah is another filled with great news from the Doctors! Because Sarah has done such an incredible job resting and obeying Dr.'s orders, there has been no change AGAIN and she was sent home to continue bed rest with baby Hannah tucked snugly in Mommy's tummy. Thank you to all who are lifting Sarah and her family up in your daily thoughts and prayers.


For the O'Brien's dinner on Sunday evening, they were treated to a great vegetable soup brought by Mike's boss and his wife. It's so wonderfully amazing to watch all those that love this family rally around them and contribute in any manner needed! Wow! I thought about apologizing to all of you for not having a new dinner recipe to share, but then I thought...."Wait a minute, it's not about the food (well, the food part is fun though) it's about Sarah and her family." I guess I still could have gone over and taken a picture of their meal for you, but since I just thought of that..I didn't and I don't. So, keep checking the blog and I promise you we'll have lots more to share and we'll update you on the baby. Deal? Deal.

Also, I wanted to send a HUGE Thank You to Adele (Sarah's Mom) and her two sisters (Rachel & Becky) who hosted a beautiful Baby Sprinkle this weekend for Sarah. You ladies outdid yourselves! The food was absolutely amazing, the decorations adorable and your hospitality heart warming! Thank you for allowing my girls and myself to share in a wonderful afternoon of celebration. HUGS!!

Sunday, November 9, 2008

Scrumptious Sugar Gems

I love sugar cookies! Every year, just prior to Halloween, our family sets aside one evening that we bake and decorate sugar cookies in all sorts of fun shapes and sizes and decorate them with LOTS of icing and sprinkles. We then take our goodies to a large blanket on the family room floor, sit in front of a roaring fire and watch "It's the Great Pumpkin, Charlie Brown". It's been a great tradition to enjoy with the kids through the years! It gives me a fleeting glance at what could be considered a Norman Rockwell moment. I have tried several sugar cookie recipes and they've all been good but not mouth watering, don't need layers of icing for taste good. So, I've continued to search for the "perfect" sugar cookie recipe. Well my blogger friends...I think I've found it!

When I read this recipe on The Sisters Cafe, I bookmarked it and couldn't wait to bake these fabulous cookies. While this isn't a dough you can use to do cookie cut-outs, it's well worth the sacrifice for the taste of this incredible recipe! The dough does not have to be refrigerated after mixing which makes the process a little quicker than most sugar cookie recipes. I have to confess that after suffering through long minutes of divine aroma of the first batch of baking cookies, I nearly burned all my taste buds off tasting a VERY hot cookie. But, ohhhh was it worth it! The cookies had a great thickness to them that makes every bite a heavenly mouthful. The oil and butter combined make for a very soft cookie that is wonderful without icing, but once I tasted them WITH icing....there was no turning back...I was addicted. The icing calls for 2 tsp. flavoring of any kind. I went with almond extract and never regretted it. It was the perfect addition to the perfect sugar cookie! If you plan to do alot of Holiday baking, add this recipe to your list and you'll certainly be thankful you did.

Sugar Gems

Cream together:
1 cup powdered sugar
1 cup sugar
1 cup oil
1 cup real butter
2 eggs
1 tsp. vanilla

Add:
5 cups flour
1 tsp. cream of tartar
1 tsp. salt
1 tsp. soda

Mix all ingredients well. Roll into golf size balls and place on cookie sheets. Flatten with bottom of glass dipped in sugar. Bake at 350 for 12-14 minutes. Cook and frost with sugar gem frosting.

Sugar Gem Frosting

2-21/2 cups powdered sugar
1/2 cup oil
2 tsp. flavoring (almond, vanilla etc.)
3-4 Tbsp. milk
Coloring if wanted

Mix well and add a little more milk or powdered sugar to get the right consistency.

Source: Melanie @ Sisters Cafe

Thursday, November 6, 2008

Slow-Cooker Salsa Chicken

If you're like me, you love to spend time in your kitchen cooking and baking and trying excitingly new recipes. There are days that I could whittle the entire day away cooking, but there are so many instances that quick and easy is the only way to go. When a friend shared this recipe with me I knew it would appear on my weekly menus repeatedly over the months because of its simplicity but more so because it was a HUGE hit with my family. The picture does not do this dish justice. Now that we have set our clocks back, there is no natural light at dinner to photograph foods, so I'm left to use the kitchen lights with no flash and the result is a dull, colorless picture. You'll have to take my word that this is a scrumptios meal to feed your family! There are only four ingredients that you can throw in the crock-pot in less than 5 minutes, you go about your day for 6-8 hours, boil some rice and then plate up a fabulous dinner that your family will love. Next time you know you'll be in a pinch during the dinner hour, put your slow-cooker to work for you with this savory chicken dish. You won't be dissapointed!

Salsa Chicken

3 to 4 skinless-boneless chicken breasts
taco seasoning (as much or little as you want)
1 (16 oz.) jar salsa (mild, medium or hot...please your own tastebuds)
1 can fat free cream of mushroom soup
1 cup fat free sour cream

Layer first four ingredients in crock-pot in order listed. Cook on low for 6 to 8 hours. During last 15 minutes of cooking time, stir in sour cream.

Serve over rice.

Source: Malynn Hearon

Tuesday, November 4, 2008

TWD - Rugelach

This week for Tuesday's With Dorie, Grace of Piggy's Cooking Journal chose Rugelach. I can't begin to tell you how to say it correctly. Ruga what?? Roo-gu-la? Is the "ch" silent or pronounced making the "ch" to sound like a cat coughing up a fur ball? Oh, sorry, not a pretty mental picture for a food blog. Well, I'm not really positive on how it's properly pronounced, but I can absolutely, positively share that this was a fantastically yummy pastry! D-E-L-I-S-H!

The preparation of Rugelach was a little more difficult than I thought it would be. My dough blended together nicely in the food processor, but after refrigeration, did not want to roll out at all. I ended up working the rolling pin too much which caused the dough to warm and stick to the pastry sheet which made it rather difficult to roll the cookie into a crescent shape. But, I persevered and while my first batch looked worse than awful, they tasted divine and before I could get any pictures, my family had eaten all but two. Made for a great lesson of the old adage...Don't judge a cookie by it's cover. Ha! For my second batch, because I still couldn't get the dough to roll out to the circumference called for in the recipe, I decided to cut 8 wedges instead of 16 hoping this might create a nicer looking cookie. A select few of the second batch looked presentable, but the dough didn't seem to hold together properly through the baking process. ???

The Rugelach filling is a combination of raspberry jam, nuts, sugar, cinnamon and semi-sweet chocolate. Although some of my filling ran out of the dough, the flavors were heavenly.

I have to share that I fall further and further in love with my Baking From My Home to Yours cookbook every week. The recipes are thoroughly described, simple to follow and challenge me to expand my baking abilities beyond drop cookies and pan brownies. I'm so thankful that I chose to join Tuesday's With Dorie because it holds me accountable to try something new and exciting every week from this great cookbook. My family is also enjoying the wonderful aromas and delectable tastes of so many new sweet treats.
Thank you Grace for choosing Rugelach for this week! I may never learn how to say it correctly, but I'm determined to bake these again to attain a beautiful cookie that matches it's wonderful flavors!
Once again, blogspot has a mind of its own with the font of my posts...I have tried multiple times to rectify this and have given up. It's readable, it's late and my kids are fighting. Three great reasons to sign off for tonight.
Source: Baking From My Home to Yours by Dorie Greenspan

Monday, November 3, 2008

Pumpkin Biscotti

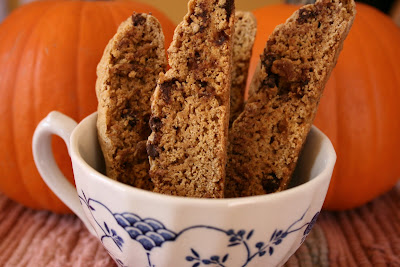
A few weeks ago, I experienced my first opportunity to bake biscotti with Tuesday's with Dorie and I fell in love with the texture and flavor of that little biscuit. Ever since then I've been looking for a recipe that would incorporate flavors of the Autumn season and would yield a richer type of biscotti. When I found this recipe for Pumpkin Biscotti, I immediately bookmarked it to fix when I had some extra time. (o.k., I know, as a Mom we don't have "extra" time with all the laundry, cooking, sports, homework...blah, blah, blah, what I meant was any time that I could carve out for myself....oh-let's not go there either. You know what I'm saying.) I loved, loved, loved this biscotti! The pumpkin flavor is tremendous and was even heartier after sitting for a day. The recipe called for chopped pecans, but instead, I stuck to my favorite addition to pumpkin...chocolate! I seriously cannot get beyond the delectable combination of those two ingredients. I'm sooo glad I added the mini chips, they were a delicious addition and it turned out to be a great way to entice my kids to try a different looking cookie. They loved 'em! On Sunday, I took these over to my friend Sarah's to share with her and she seconded our opinion that these were a hit. You won't regret trying this variation of my new type of cookie...biscotti!

Pumpkin Biscotti

3 1/2 cups flour
1 1/2 cups brown sugar
2 teaspoons baking powder
1/2 teaspoon salt
2 teaspoons pumpkin pie spice
1/2 cup solid-pack canned pumpkin
2 eggs
1 tablespoon vanilla
1 1/4 cups pecans, coarsely chopped and toasted

Preheat oven to 350 degrees.
Grease (I covered with parchment paper) 2 large baking sheets. In a large bowl, combine flour, sugar, baking powder, salt and spice. In a small bowl, whisk together the pumpkin, eggs and vanilla. Add the pumpkin mixture to the flour mixture, stirring until well combined. Knead or gently stir the toasted pecans into the dough. Place dough on a lightly floured surface and divide into 3 equal portions. Lightly flour your hands. Shape each portion into a slightly flattened log about 3-inches by 12-inches. Place logs 3-inches apart on prepared baking sheets. Bake for 25 minutes. Do Not Shut Off Oven! Remove from oven and place baking sheet on a wire rack to cool 15 minutes. Reduce the oven temperature to 300 degrees. Transfer each log to a cutting board. Using a serrated knife, cut diagonally into 1/2-inch slices. Line the slices up, standing, on the baking sheets and bake 12-15 minutes, until dry. Cook on wire rack.

Source: All Recipes

Sunday, November 2, 2008

Sundays For Sarah-Creamy White Chicken Chili

First of all, I would like to apologize for not posting any new, yummy recipes this past week. It's been crazy busy around our household and while I have continued to cook and bake some delectable dishes for my family this week, I haven't had one spare minute to download and post anything to share with you. Please remain patient and I'll get caught up soon.

Now, for some really great news. Sarah had a very positive Doctor's visit this week. The medications are doing their job and keeping her contractions under control, so she was ordered to go home and straight back to bed. Another week that precious Hannah has continued to mature and grow inside Mommy's tummy. Wonderful, wonderful news!!
This time Sarah and I chose a recipe together. Our family was going to be extremely busy this weekend at a soccer tournament with our son, but I wanted to follow through with Sunday's for Sarah. So we talked and decided that a soup or chili recipe sounded good and would fit in with our family's weekend time schedule. I remembered a great chicken chili that my friend Jennifer had fixed for our Bible study group awhile ago and she had submitted the recipe to be published in our church's cookbook. When I read through it Saturday evening, I knew it was the perfect, quick dish to prepare and it sounded absolutely delish!

This chili was so EASY to prepare and the flavors of all the spices and chilies was fantastic. We topped our bowls of chili with a little extra sour cream and cheddar cheese and savored every delicious bite. Sarah and I both said that this is definitely a new favorite for both our families. You won't be disappointed if you choose to try this recipe.

Creamy White Chicken Chili

1 lb. boneless chicken, cut in cubes
1 medium onion
1 1/2 tsp. garlic powder
1 T. vegetable oil (I used extra virgin olive oil)
2 (15 oz.) cans Great Northern beans, rinsed and drained
1 can chicken broth
2 (4 oz.) cans chopped green chilies
1 tsp. salt
1 tsp. ground cumin
1 tsp. oregano
1/2 tsp. pepper
1/4 tsp. cayenne pepper
1 c. sour cream
1/2 c. whipping cream
In a pot, saute chicken, onion and garlic powder in oil. Add beans, broth, chilies and all seasonings (salt, cumin, oregano, pepper and cayenne pepper). Bring to a boil; reduce heat and simmer, uncovered, for 30 minutes. Remove from heat; stir in sour cream and whipping cream.

Source: Jennifer Wall -Sharing Our Best